다음 내용은 'Doit! 플러터 앱 프로그래밍' 책 내용을 정리한 내용입니다.
material design은 구글에서 2014년부터 사용한 플랫 디자인(flat design) 지침이다.
material design을 적용하면 평면, 단색 위주의 간결한 디자인을 바탕으로 앱의 용량을 줄이고 동시에 속도를 개선할 수 있다.
flutter로 앱을 제작할 때 material design을 적용하려면 Scaffold 클래스를 사용한다.
scaffold 클래스는 각종 위젯을 material design 레이아웃으로 설계하는 것을 돕는 역할을 한다.
import 'package:flutter/material.dart';

void main() => runApp(MyApp());

class MyApp extends StatelessWidget {
  @override
  Widget build(BuildContext context) {
    return MaterialApp(
      title: 'Material Flutter App',
      theme: ThemeData(
        primarySwatch: Colors.blue,
      ),
      home: MaterialFlutterApp(),
    );
  }
}

class MaterialFlutterApp extends StatefulWidget {
  @override
  State<StatefulWidget> createState() {
    return _MaterialFlutterApp();
  }
}

class _MaterialFlutterApp extends State<MaterialFlutterApp> {
  @override
  Widget build(BuildContext context) {
    return Scaffold(

    );
  }
}
StatefulWidget 클래스를 상속받는 MaterialFlutterApp 클래스를 만든다.
Stateful 위젯을 화면에 출력하려면 State 클래스를 이용해야하므로 State 클래스를 상속받는 _MaterialFlutterApp 클래스도 만든다.
class _MaterialFlutterApp extends State<MaterialFlutterApp> {
  @override
  Widget build(BuildContext context) {
    return Scaffold(
      appBar: AppBar(title: Text('Material Design App'),),
      floatingActionButton: FloatingActionButton(child: Icon(Icons.add),
      	onPressed: () {
      }),
    );
  }
}
Scaffold에 appBar를 선언하고 새로운 Appbar를 생성한다.
그리고 AppBar에서 title값에 Text() 함수로 'Material Design App' 이라는 문자열은 입력했다.
floatingActionButtion을 선언한 후 새로운 FloatingActionButton() 함수를 생성해 이 함수에 child를 선언하고 Icon을 이용해 Icons.add 를 선택하면 +버튼이 표시된다.
지금까지 만든 플러터 앱의 위젯 구성을 그림으로 표현하면 다음과 같다.
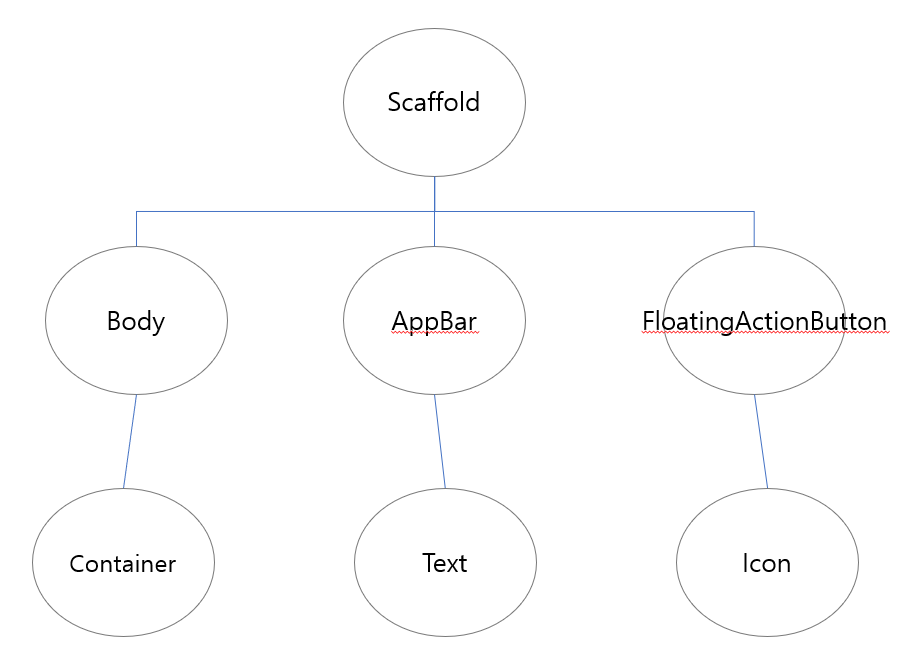
Body는 앱의 메인 화면을 구성하는 본문을 나타낸다.
다음 코드는 body 안에 여러 위젯을 넣는 코드의 기본 골격이라고 볼 수 있다.
class _MaterialFlutterApp extends State<MaterialFlutterApp> {
  @override
  Widget build(BuildContext context) {
    return Scaffold(
      appBar: AppBar(title: Text('Material Design App'),),
      floatingActionButton: FloatingActionButton(child: Icon(Icons.add),
        onPressed: () {
      }),
      body: Container(
        child: Column(
          children: <Widget>[

          ],
        ),
      ),
    );
  }
}
Scaffold 안에 body를 선언하고 그 안에 Container의 child로 Column을 지정한다.
Column 안에 children을 이용해 위젯 목록 배열 형태로 나열할 기본 골격을 만든다.
위젯을 여러개 만들 때 Row와 Column 위젯을 이용하는데 Row는 가로, Column은 세로로 위젯을 배치한다.
이때 Row와 Column 옵션 안에는 child가 아닌 children을 이용해 배열 형태로 선언한다.
class _MaterialFlutterApp extends State<MaterialFlutterApp> {
  @override
  Widget build(BuildContext context) {
    return Scaffold(
      appBar: AppBar(title: Text('Material Design App'),),
      floatingActionButton: FloatingActionButton(child: Icon(Icons.add),
        onPressed: () {
      }),
      body: Container(
        child: Column(
          children: <Widget>[
            Icon(Icons.android),
            Text('android')
          ],
          mainAxisAlignment: MainAxisAlignment.center,
        ),
      ),
    );
  }
}
'Flutter' 카테고리의 다른 글
| 2-3. 위젯의 생명주기 (1) | 2022.02.17 |
|---|---|
| 2-2. Flutter 프로젝트 기본 구조 2 (0) | 2022.02.14 |
| 2-1. Flutter 프로젝트 기본 구조 (0) | 2022.02.12 |
| 1.4 Dart 스트림 통신하기 (0) | 2022.02.12 |
| 1.3 Dart으로 JSON 데이터 주고받기 (0) | 2022.02.11 |

